Wednesday, July 31, 2013

Chambray and Prints

So I recently found a pair of the most comfortable pants I have ever worn and you are going to either love them or hate them. :) They're a mixture between PJ's and Harem pants. Who know's.. But I have worn them several times with a variety of shirt styles and I'm still not tired of them. 
My other favorite thing at the moment is chambray because of the versatility of it, Just my style. What is your favorite trend right now?


Top: Rue21
Pants: Target
Sandals: Target
Sunnies: Versona
Backpack: Target

Have a happy rest of the week my loves! 

Friday, July 26, 2013

DIY Soap tray

I'm always into cute displays that are functional, so when I saw an idea on Pinterest I knew I wanted to make something similar to house the soap dispenser and a cute ring holder. I used some things I already had on hand but are really easy to find at Goodwill or Dollar Tree.
                                                                         Supplies:
                                                                Two candle stick holders
                                                              (I found mine at dollar tree)
                                                                      Glass adhesive
                                                                       Tray or plate
                                                   (This one was about $1 at a thrift store)
                                         
Glue the top ends of the candlestick holder together where the candles would originally go and allow to dry overnight.


Glue to the tray, allow to dry and your'e done!

I added a cute little thrifted tea cup to hold my rings while I wash dishes, make cookies or for whatever reason I would remove them.
Total: $3.29. 
Hey, I'm totally into that number! 

DIY No Sew Curtains!

I was trying to find a quick temporary solution for the kitchen sink window until we finish the remodel so I had these curtains already on hand and decided to whip them up real fast. And I really mean it when I say "fast" too!


For this project I used a curtain I already had and cut it in half. It had an existing pocket that I could have run the rod thru but I wanted a nicer draping effect then what the pocket gives. plus it looks more custom. Measure the length of your window and cut the curtain to the length you need. You can hem all the raw edges or use fray check if you don't have a sewing machine.

Next you cut pieces of ribbon in small strips ( about 3-4 inches long depending on the size of the curtain rod)
and add a bead of glue to the top of the ribbon and the same on the bottom where the red dot indicates.

Run the pole thru the loops you created with the ribbon and your'e done!!
 See, wasn't that easy? 
If you have any questions feel free to ask!

Momma‘s Go-to maxi

When it comes to fashion two of my favorite things are black and a maxi. And when the two are combined that's even better! I'm pretty sure I've repeated this black on black number five times now and just changed up the accessories because it is so easy to wear, but one step up from the sweat pants that you would catch me in five days a week ha ha! What is your Go-to outfit?


P.s I apologize for the poor dressing room lighting. Outdoor photo shoots are ideal but not always possible with the weather we've been having lately :) also, my baby was napping so sweetly in the stroller while I shopped too..he's precious.


Top: Thrifted
Skirt: Thrifted
Scarf: Target
Watch: Target (Old)
Purse/Diaper bag: Thrifted
Infinity bracelet: Rue21
Beaded bracelet: Target
Necklace: Target (old)
Pointer finger ring: Target (old)


Thursday, July 25, 2013

Chandelier jewelry

I'm in the process of redecorating my kitchen and dining room (along with every other room in my house). We've had this chandelier for a few years and eventually I want to replace it with a more modern light, but for now it serves it's purpose. Anybody that knows me knows I love bling, glittery, shiny anything so I was racking my brain on what to add to this chandelier just to incorporate a little cuteness and I happened to have a chain in my craft box and it worked perfectly! Do you have an old chandelier or light fixture that you're dying to update too?

Monday, July 15, 2013

Topknot and Tee's

Richard and I celebrated three years of marriage last week so yesterday we had a fun day out shopping at the Flea Market and Starbucks. We took little man along because we absolutely love hanging out with him! This outfit is a go-to for me. It combines two of my favorite things, T-shirt and a Maxi. It is comfy and perfect for chasing a toddler around and all those dirty hand prints that magically appear all over me by the end of the day. I can't stop wearing my hair in a topknot! It is so easy and I pretty much sleep in it for a few days before I HAVE to wash my hair. This Dolce and Gabbana bag is one that I found while thrifting for ten bucks! It is big enough to double as a diaper bag which is important to me because because lately I have been really into carrying purses that serve both purposes to cut down on the load I have to carry already. Hope everyone had a great weekend!

Tee: Target 
Maxi: Thrifted
Necklace: Versona
Sunglasses: Target
Bag: Dolce and Gabbana {Thrifted}

Friday, July 5, 2013

Room Makeover Part One

About six months ago we decided to do a room makeover that led into an entire house makeover! We are still working on getting everything done in the rest of the house, but here is the most recent completed project so far. If you're addicted to Pinterest like me, then I'm sure you have seen all the beautiful DIY tufted headboards out there. I just love the way it instantly makes a room feel luxurious and put together. This one was fairly easy to do. We just cut a piece of half inch plywood to the width of our bed and left it at the four foot width that it came in. I stapled on two old comforters for the "Batting" and then stapled on a curtain that I bought for $2! I started by stapling only at the top of the headboard first just to hold the fabric in place so i could start stapling the tufts. I smoothed out my fabric and then made a template for how far apart I wanted my tufts. It's important that you tuft first before you staple all the fabric to the back of the plywood. do your research before beginning this kind of thing, I'm so glad I did because I probably wouldn't have known to tuft first. I plan to add a little bling on top of the stapled tufts instead of buttons so please excuse that little detail for now :)
I'm so pleased with how the room looks now. 
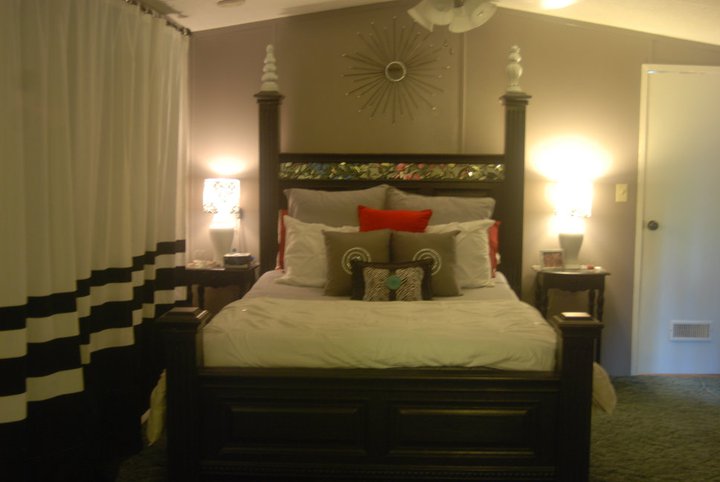
I wanted a calm and fresh feel so that's why I chose neutrals and a little glam. The hubs is really pleased with it as well, which makes me very happy too! I have plans to replace (convince the hubs) the ceiling fan with a chandelier that I have been eying ;) 

The end tables were black before so I spray painted them with a flat chocolate brown and added some acrylic craft paint in "Antique Gold " with a sponge brush in circular motions.


     I found two clear acrylic lamps from Target (via Hudsons) for $12 each and they were perfect for the 
design I had in mind! 
(I still have to style the hubs side table)


            This mirror is one of my favorite pieces in the room. It was also a Target (via hudsons) find. I think it was $15? I just love how it adds another touch of sparkle to the room. 


 All of the bedding and accessories are Target (via Hudsons) The lamp shades were originally white so I found a curtain that was a couple of dollars and recovered them and added a ribbon and glued on some beads for a custom finished look. The closet curtains are DIY made from three different curtains and are kind of make do for now until I find exactly what I'm looking for.
.


This was before we started the makeover. I liked it then, but the new look definitely represents my style a whole lot more! 
thanks for stopping by, I hope you enjoyed checking out our little room! stay tuned for more progress in the
master bath coming soon! 

Next on the list:
Wood flooring